Thursday, December 31, 2026
Estimated read time: 9 Minutes
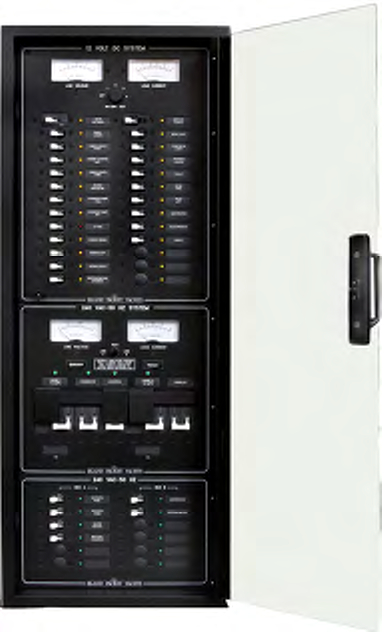
Paneltronics offers multiple panel layouts, circuit counts, and metering arrangements. Representative catalog images are shown; available options depend on the model.
Who Should Read This?
This guide is for people specifying, buying, or replacing electrical panels for boats, specialty and emergency vehicles, mobile equipment, and other OEM applications. Whether you need one panel or a production quantity, the process starts with the electrical requirements and the space available for the installation.
What the Panel Configurator Does
The Paneltronics panel configurator enables you to identify the pre-engineered AC or DC panels to configure, capture the electrical specifications, and choose from an assortment of panel options, including meter type, breaker ratings, circuit labels, and more.
Labels are available and can be mailed at a later date if they are not known at the time of quoting or ordering.
Start with the panel selection
Browse the Design Guide or page through the Catalog, located in the bottom right corner of the Paneltronics home page, to become familiar with the panel selection. Panel selections are grouped in Series by the panel width. A pre-engineered panel is an existing Paneltronics model with an established layout and circuit arrangement. You customize that foundation through the options available for the model, rather than beginning with a new panel design.
What this walkthrough covers
For this demonstration we will use a panel from our 3000 Series, our model 3203, a DC 12 position panel with meters and a main breaker. The walkthrough highlights the panel configuration process that applies across all panel Series. The specifications and circuit names will reflect your own equipment.
Breakers and standard function labels are included in the panel cost. Breaker ratings and meter type, where applicable, are needed to process the quote or order.
Prepare your requirements before configuring
Catalog pages 38 to 41 explain the system planning behind panel selection. Gather the following information with the person responsible for your electrical design:
- Available space: panel width, height, depth, cutout, wiring clearance, and access for installation and service.
- Electrical system: AC or DC voltage and the required main and branch breaker ratings. For AC systems, confirm the number of input sources, shore cords, generators, and inverters.
- Circuit schedule: the function and breaker selection for each numbered position, and known labels. Spare positions for future expansion are always recommended.
- Panel features: analog or digital panel meters where available, color, and add-ons such as hinge, frame, enclosure, and door.
- Project details: quantity, application, contact information, requested delivery date, and planned installation date.
What the configurator does and does not do:
- The Paneltronics panel configurator offers dropdown selections for the chosen panel.
- The Paneltronics panel configurator does not perform load calculations or load balancing, size conductors, or confirm the installation design.
- For a marine application, we strongly recommend consulting a certified marine electrician to confirm installation, integration, and compatibility with the new or existing electrical system.
The 3203 example circuit schedule
Our 3203 panel will be configured for a 24VDC application with an 80A main and analog meters. For the branch circuits, positions 1 through 11 have a 5A breaker selected, and position 12 has a 20A breaker. Each circuit has a breaker value and a label in numerical order.
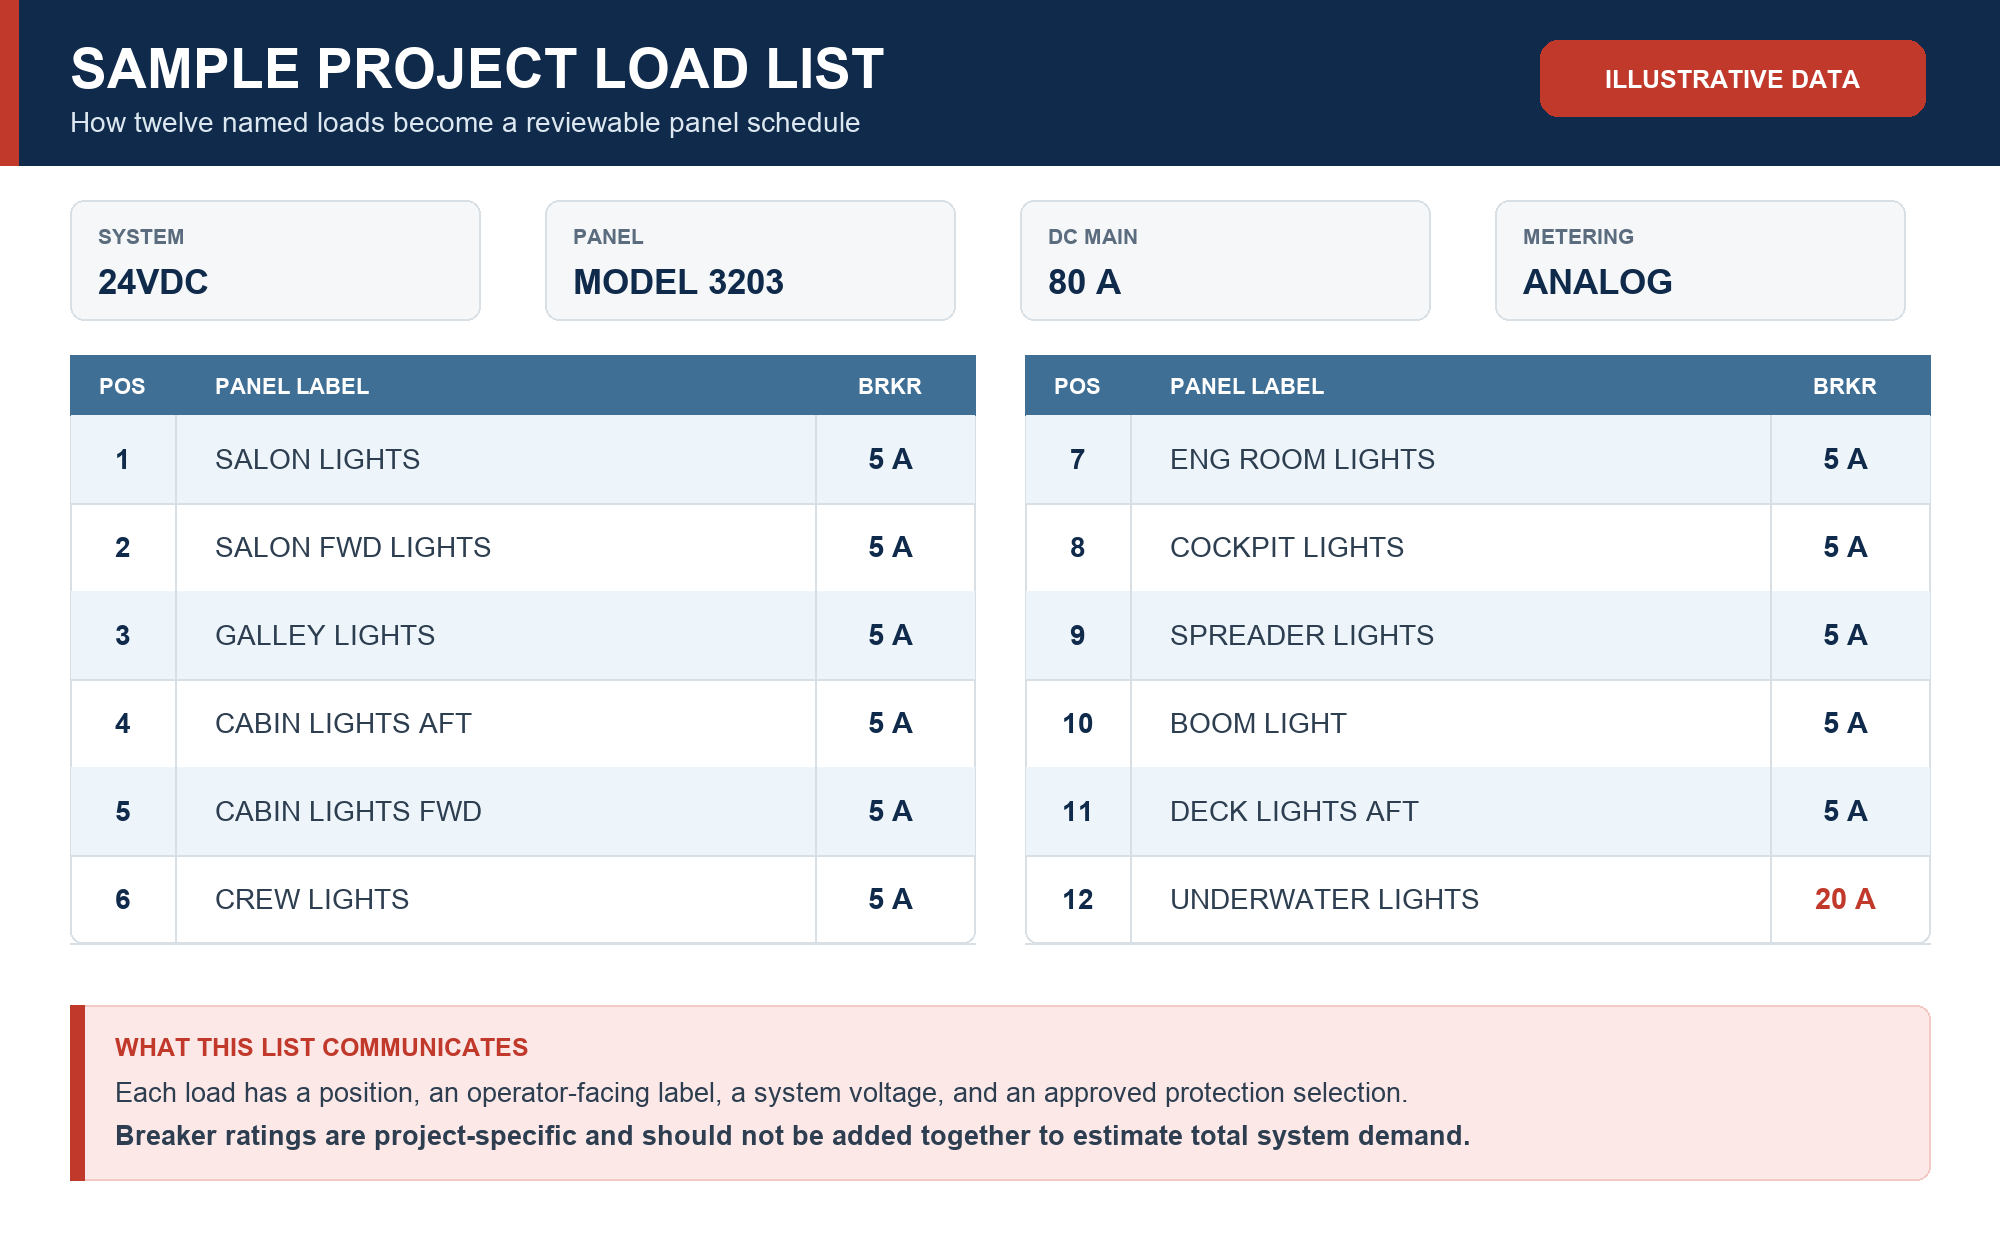
Figure 1. The illustration is for example purposes only. Your panel, breaker, and label selection may differ depending on your specific application.
Step 1 Select an existing panel design
Choose the model that fits your circuit count, electrical arrangement, and available installation space. Model 3203 is a DC circuit breaker panel with 12 branch positions, a main breaker, and meters. Its published dimensions are 13 3/4 inches wide, 7 inches high, and 3 1/2 inches deep.
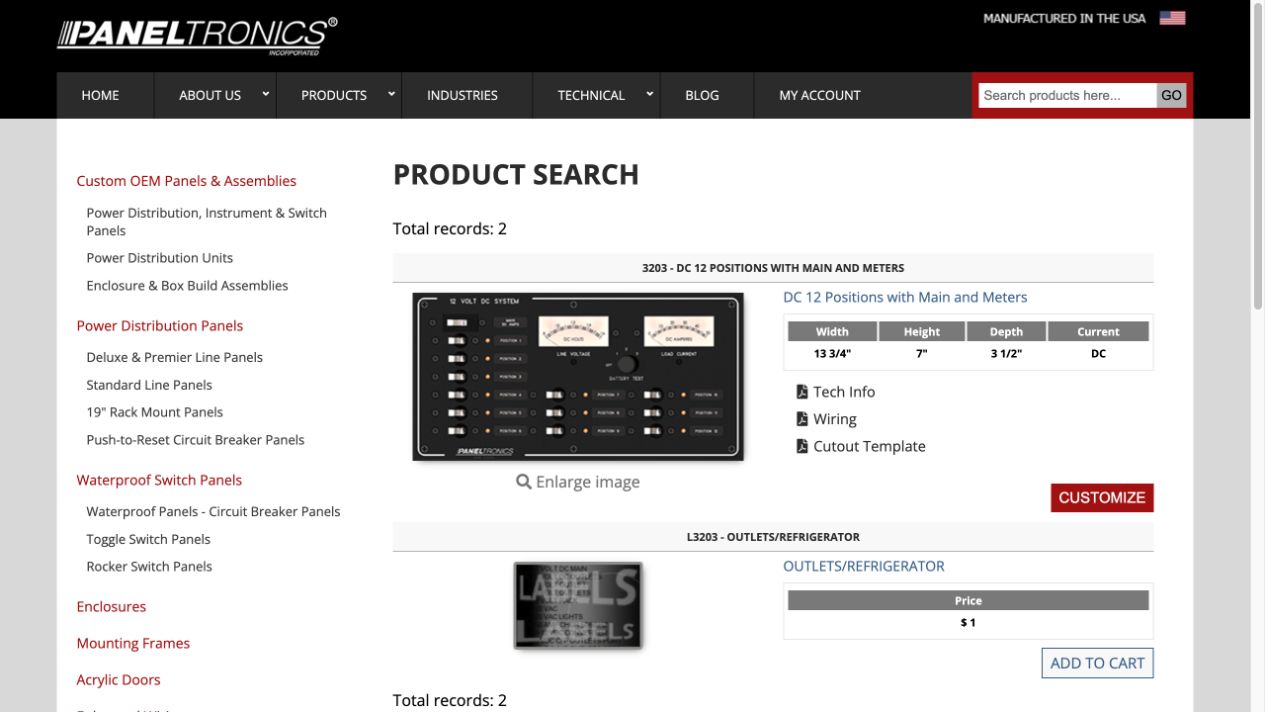
Figure 2. Model 3203 on the Paneltronics product-search page, with specifications, technical documents, and the CUSTOMIZE button.
Open Tech Info, Wiring, and Cutout Template before selecting CUSTOMIZE. Check the panel dimensions against the available space, and review the connections and service access with your installer. Exterior panel dimensions alone do not establish the cutout or the clearance needed behind the panel.
Consider operation as well as fit
The catalog also calls attention to readable meters, indicator lights, backlit labels, a user-friendly layout, and space for expansion. Construction details such as corrosion-resistant panel material, durable finishes, tinned wiring, and appropriately rated bus bars belong in the selection discussion. Review the specifications for the model and environment you intend to use.
For AC systems, identify every power source and the required source-selection arrangement. The catalog discusses shore power, generators, inverters, leakage protection, reverse polarity, and isolation. Those topics should be resolved with your electrical professional before the panel specification is finalized; selecting a dropdown does not validate the surrounding system.
Step 2 Choose the electrical and physical options
Select CUSTOMIZE to open the Custom Panel page. Work through the options shown for the selected model, using your project requirements as the reference.
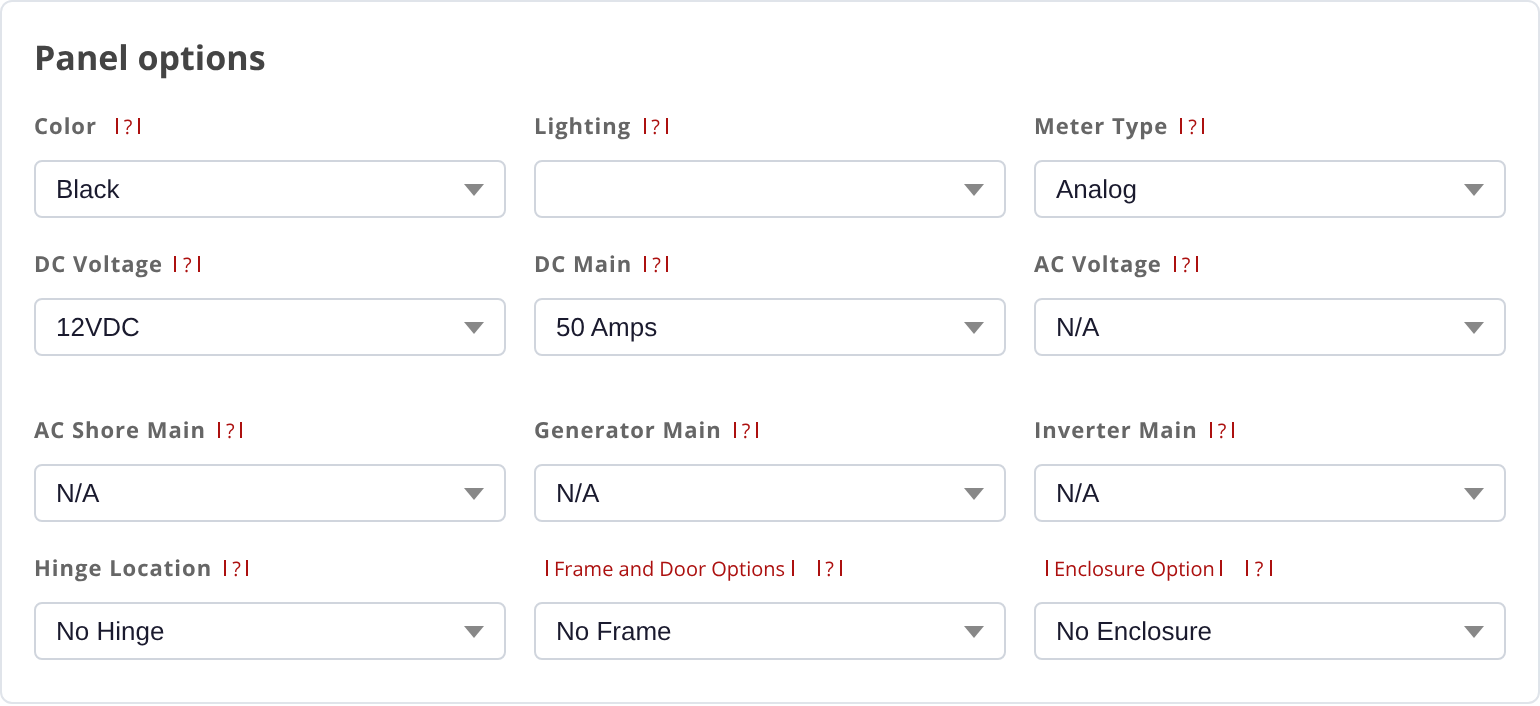
Figure 3. The Panel options card before any selections are made.
Our example uses a black panel, lighting, analog meters, 24VDC, and an 80A DC main. AC sources are not applicable. No Hinge, No Frame, and No Enclosure are intentional choices for this demonstration.
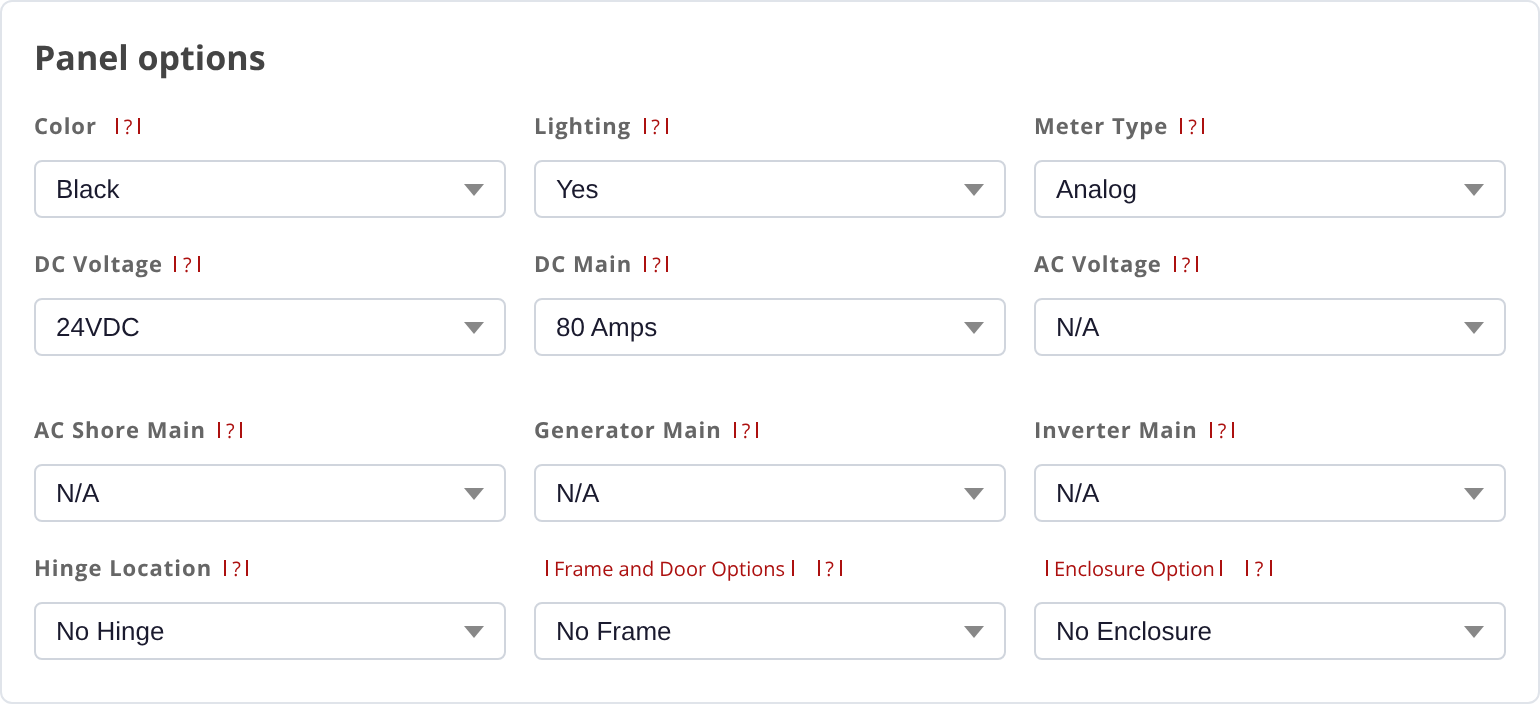
Figure 4. The same card with the example selections applied. The product images are generic and may not reflect your panel configuration choices.
Read the selected values rather than relying on the product photograph. Generic artwork may show a standard voltage, meter, or breaker arrangement even when you have requested different options.
Use the catalog order form as a planning checklist
Catalog page 44 brings together model, meter type, color, AC or DC voltage, and main-breaker information. For AC panels, it distinguishes shore, generator, and inverter mains. It also identifies hinge location, frame type, enclosure depth, and protective-door choices. Page 45 records function labels and breaker ratings by position. These are the same kinds of decisions you are organizing online.
The catalog covers options across all panel Series. All options may not be available for every panel. If you need a choice that is not shown, describe it in Special Instructions or contact our sales team so availability and compatibility can be reviewed.
Step 3 Assign breaker ratings and circuit labels
Select the specified breaker rating for each numbered position. To find a label, use as few or as many characters as you like to reveal the label choices from our inventory, then choose the intended entry from the suggestions. Paneltronics offers more than 3,000 function labels for different applications.
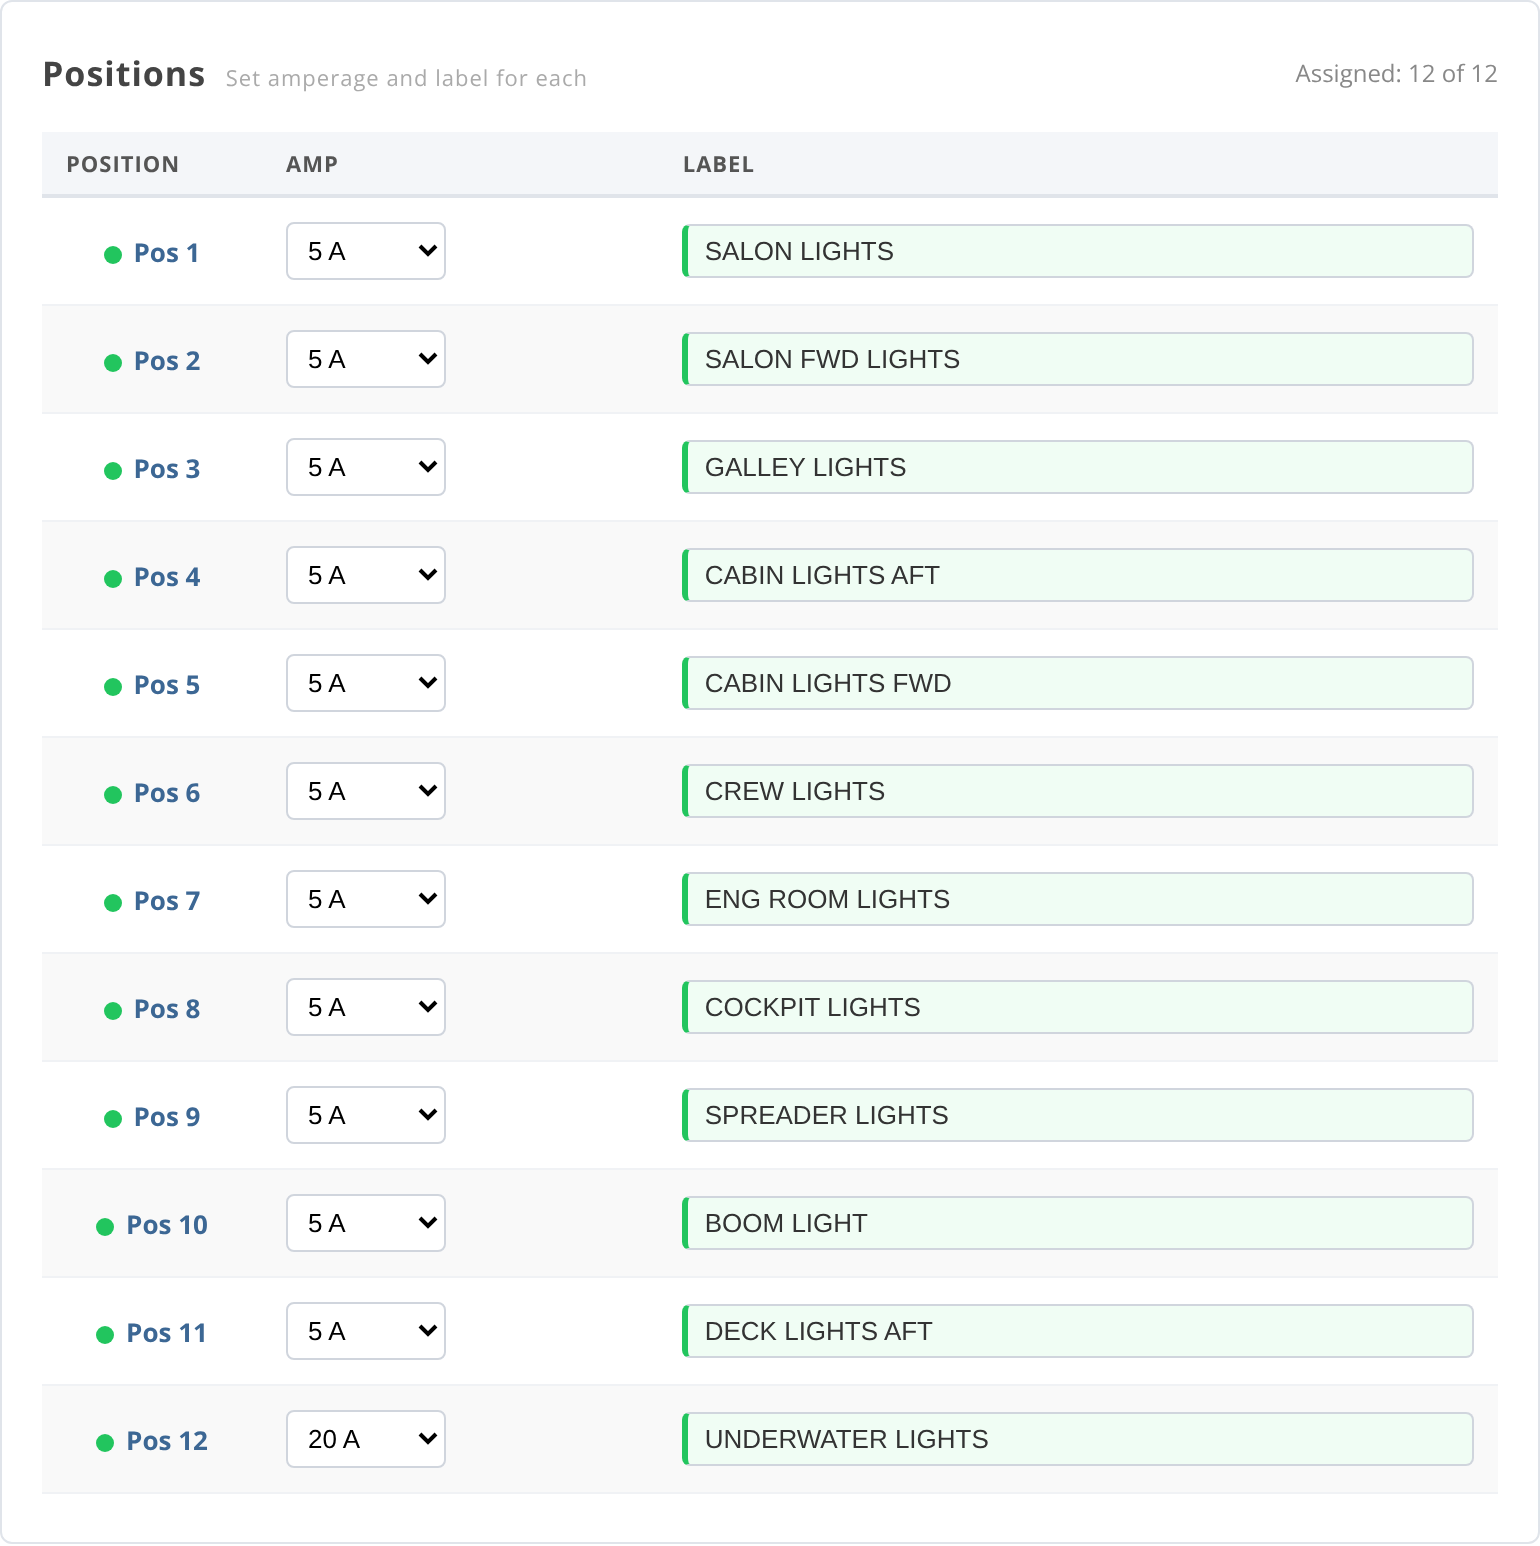
Figure 5. The completed example. The green indicators and the Assigned counter confirm each label selection, and position 12 carries the 20A selection.
Follow the numbering through the entire panel. Keep circuit names consistent with drawings, wire identification, and operating documentation.
If the labels are not known at the time of ordering, the interchangeable labels can be mailed at a later date. Tell us that labels are to be sent separately and coordinate the remaining selections with sales. Breaker values and meter type are a must have to process an order or receive a quote.
Step 4 Add the details that need a conversation
Use this section for special instructions regarding drop shipments, custom label requests, or for any additional comment or question that you would want to convey to our team for review.
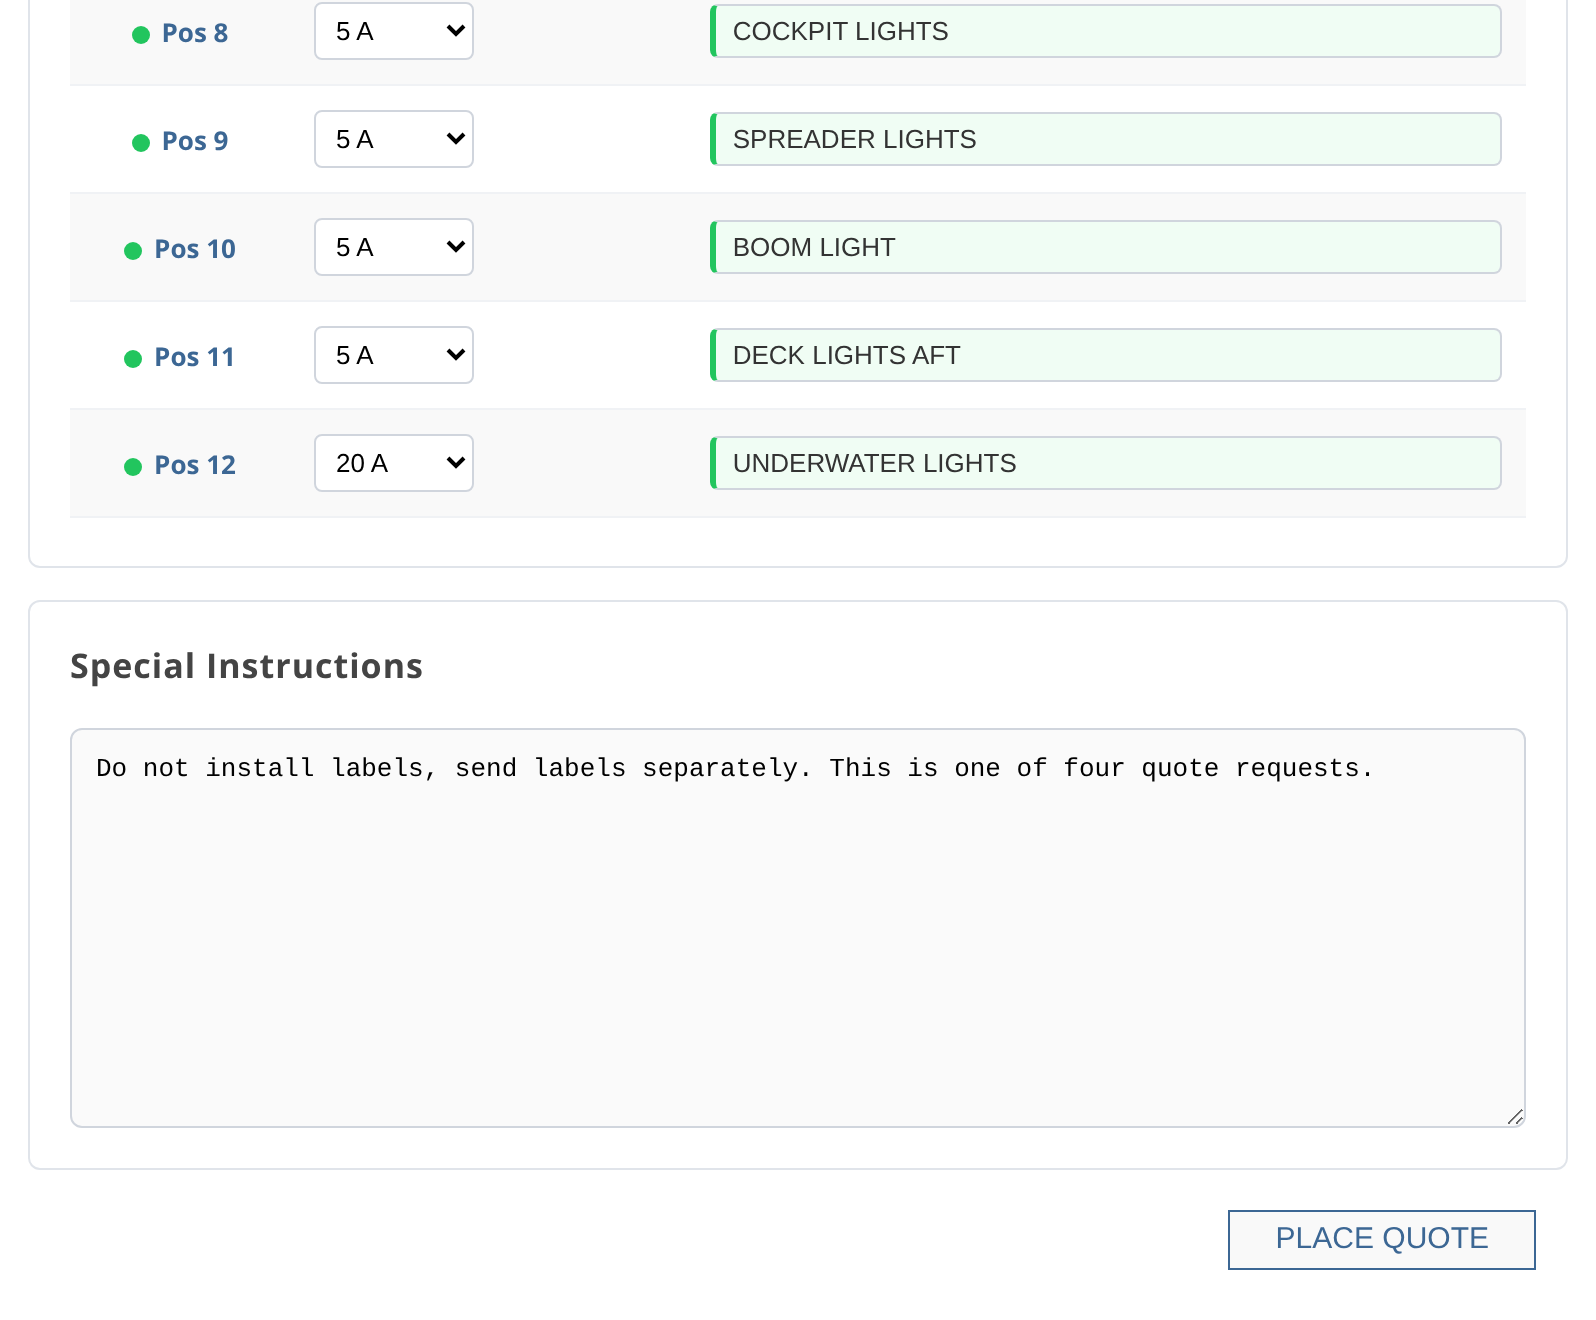
Figure 6. Special Instructions captures additional requests before PLACE QUOTE opens the next step.
Useful notes include “Do not install labels, send labels separately,” “This panel is close to what I need, but...,” “This is one of four quote requests,” “Can you drop ship this panel?” “Please call to discuss,” or “Are custom labels available?” Include the requested quantity and timing when they affect the project. A note communicates a request; our team will confirm whether it can be accommodated.
Review the configuration before continuing
- Confirm the model, voltage, applicable AC sources, main breaker, meter type, and lighting.
- Check every branch breaker rating and all labels already selected. Identify deferred labels and intentional spare or unused positions.
- Confirm mounting and access requirements, including any hinge, frame, enclosure, or door request.
- Review quantity, requested delivery and installation dates, and special instructions.
The physical dimensions of any Series panel cannot be modified. We are a manufacturing facility, so if you have a project that requires a custom engineering solution with volume, please send an email with drawings, schematics, dimensions, quantities, and project requirements to sales@paneltronics.com or info@paneltronics.com. Reference the online request if you have already submitted one so the supporting information can be associated with it.
Step 5 Submit your request and keep the reference
PLACE QUOTE opens the contact screen. There are three paths, and the difference is what happens to your request after it is sent.
- Continue as Visitor. Enter your name, email, and phone. Your request reaches our team with enough information for us to respond, but it is not attached to a customer account, so you will not have it to refer back to later.
- Login. You already have a Paneltronics account. The request goes in under that account with the rest of your activity.
- Create Account. Submit this request and set up an account at the same time. Future quote requests and orders start faster because your information is already on file.
If you expect to request more than one panel, or you want a record you can return to, the account paths are worth the extra minute.
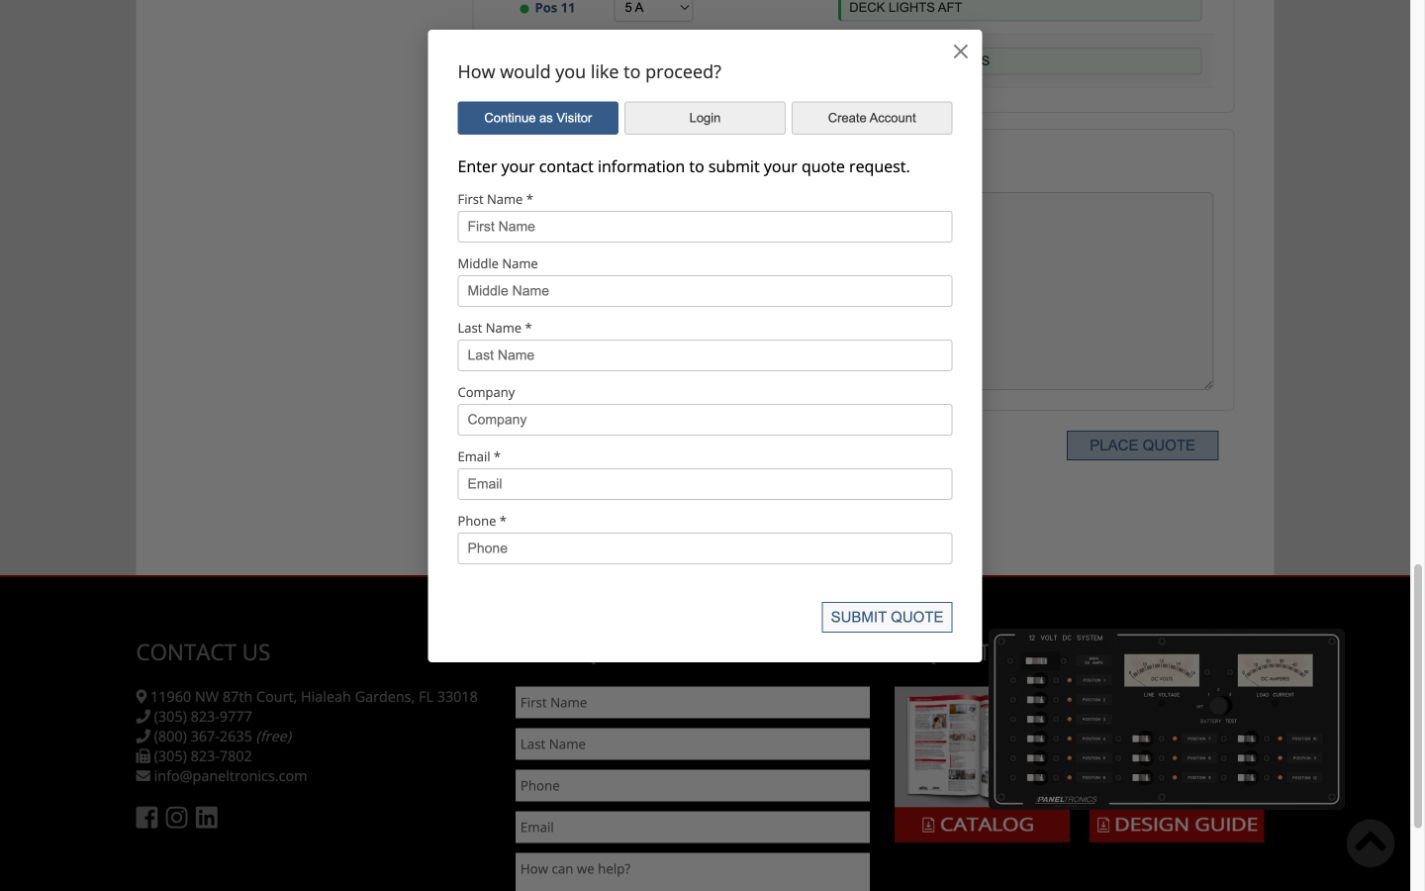
Figure 7. The contact screen offers visitor, login, and account-creation options, followed by SUBMIT QUOTE.
For the visitor path shown, complete the required first name, last name, email, and phone fields. Middle name and company are optional in this screen. Review the information, then select SUBMIT QUOTE to send the request.
What happens next
You receive a quote or ticket number, and Paneltronics receives a copy to review. Keep that reference for follow-up. You will then be contacted to confirm the price and availability of the panel selected and to address any outstanding questions.
A quote request starts that review; it does not authorize production. Confirm the final configuration, delivery expectations, and applicable order terms before placing the order. Review the catalog terms on page 46 and the terms provided with your quotation, especially before requesting changes to a panel already in production.
When your project needs more than one panel
Paneltronics panels are modular by design. Multiple modular electrical panels can be arranged in a mounting frame, wired together when applicable, when you need more circuits, separate AC and DC power distribution sections, metering, or source-selection functions. Frames, enclosures, and protective doors are additional add-ons to discuss with our team.
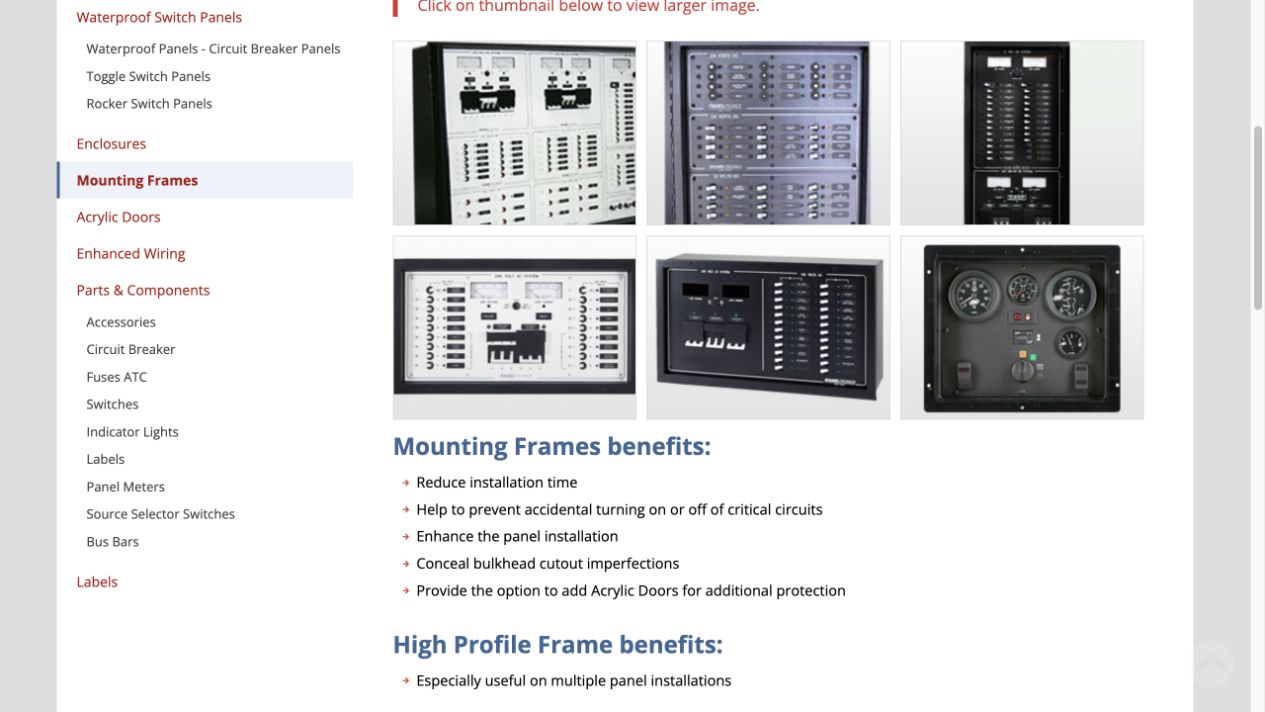
Figure 8. Isometric mounting-frame detail showing the relationship between the frame and panel. Catalog page 23.
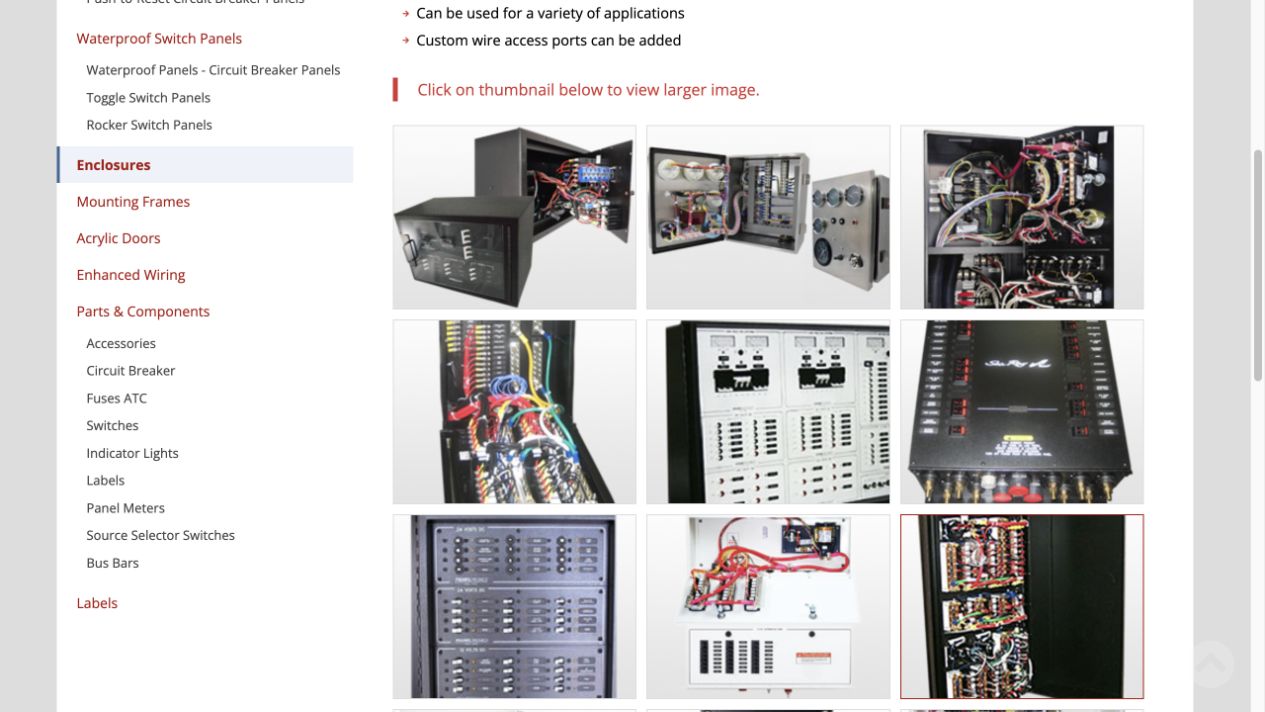
Figure 9. Standalone electrical enclosures protect the rear of a panel. Confirm the required dimensions and wiring access for your installation. Catalog page 23.
Choose a protective ACRYLIC door
A protective door adds another choice to the mounting arrangement. Paneltronics offers clear or smoked acrylic doors with different opening directions. Discuss the finish, hinge direction, available clearance, and access needs with our team so the door suits the installation.
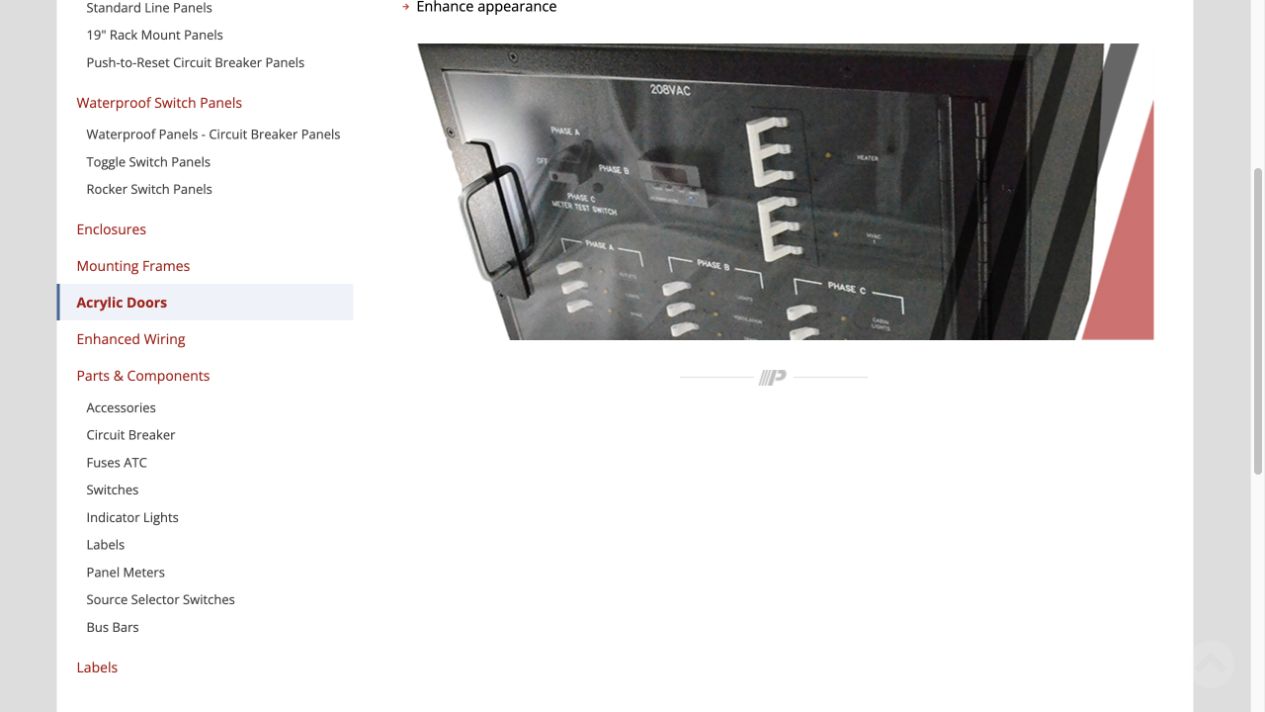
Figure 10. A multi-panel assembly with its protective door open. Catalog page 23.
Contact us early for custom OEM and volume projects
If you need production quantities, a logo, a different layout, special components, or a complete custom assembly, contact Paneltronics immediately, at the start of the project. An original equipment manufacturer, or OEM, may need a repeatable panel for integration into a product line. Volume requirements are useful to discuss even when a pre-engineered model is the starting point.
Send the intended application, quantities, schedule, drawings or schematics, dimensions, branding requirements, and any environmental or documentation needs to sales@paneltronics.com. Our team can determine whether a configured standard model or a custom design is the appropriate path.
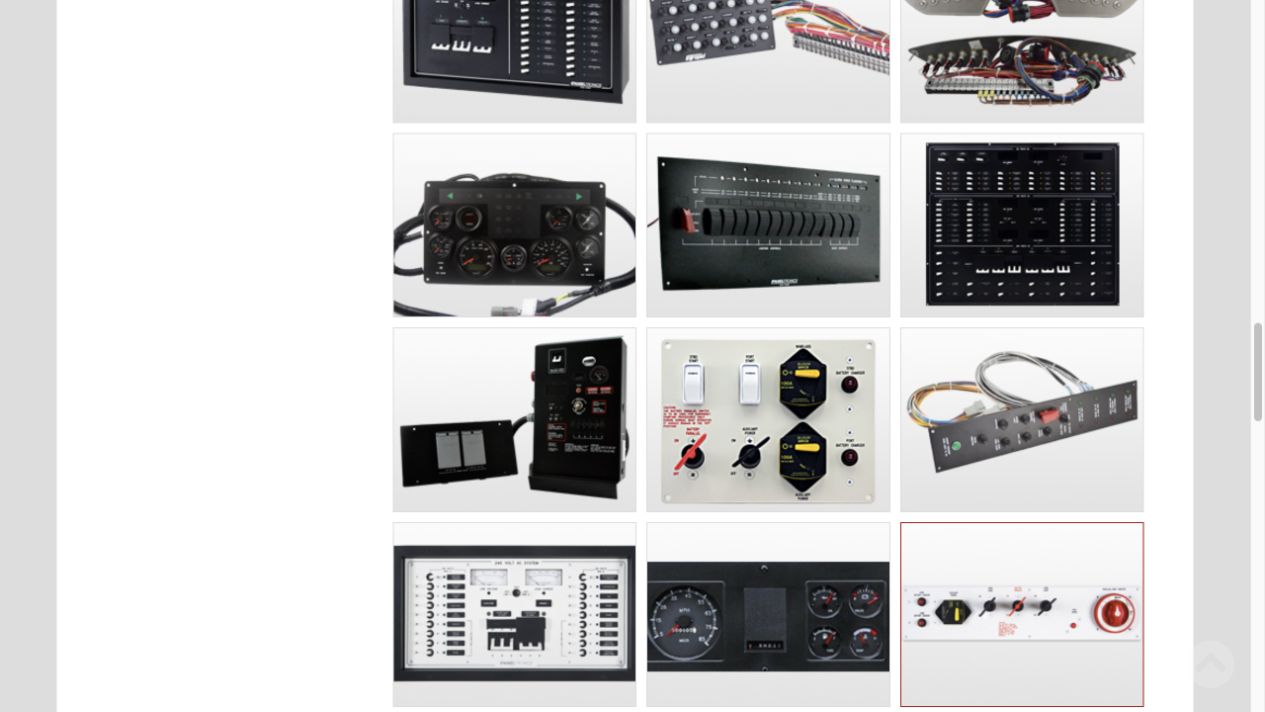
Figure 11. An OEM AC and DC panel and enclosure assembly with hinged sections open to show internal wiring and service access. Catalog page 24.
Select your panel and start the quote
Bring your panel requirements together, select the closest pre-engineered model, and use the configurator to record the details. If your project needs a custom solution or a conversation before you begin, our team can help you decide which path fits.
Request a quote for your next build at paneltronics.com, email sales@paneltronics.com, or call (800) 367-2635. Factory-trained technical support is part of every quote, not an upsell.
About the Author

|
Edwin (Ed) Robledo, Paneltronics Senior Technical Marketing. 10+ years of published content creation and technical writing in the electrical and electronics industry, including articles and white papers on circuit, electrical design, and engineering best practices. |
In Collaboration with:
Pedro Pelaez, President of Paneltronics
Mark Gropper, Paneltronics R&D Manager and ABYC Project Technical Committee Member Emeritus
Jose Verdecia, Paneltronics Engineering Manager and ABYC Project Technical Committee Member
Frequently Asked Questions
Q1. What does the Paneltronics panel configurator do?
It gives you a panel template to confirm the panel, the breaker selection, the meter type, and the labels if they are known. It records those selections and sends them to our team as a quote request.
Q2. What information should I have before I start?
The amount of available space, your electrical system requirements, the circuit schedule, the panel features you need, and the timeline to receive and install the panel assembly.
Q3. May I install labels at a later time after install?
Yes. The interchangeable function labels can be selected and mailed separately for later installation. Tell sales what remains undecided and arrange the label selection and shipment.
Q4. Does the configurator size breakers or conductors?
No. Only dropdown selections for the breakers available for each panel are provided. The configurator does not provide a load balance analysis. Have your electrical professional establish the appropriate ratings and system requirements.
Q5. Can several Paneltronics panels be combined in one frame?
Yes. Panels are modular by design and can be arranged in a mounting frame, wired together when applicable. Contact our team so the assembly can be reviewed.
Q6. Does selecting PLACE QUOTE immediately submit the request?
No. PLACE QUOTE opens the contact screen. Enter your information and select SUBMIT QUOTE, and you are done.
Q7. When should I contact Paneltronics about a fully custom OEM panel?
Immediately. Contact us at the start of the project when there is volume, when you need a logo, or when the project requires a custom engineering solution.
Q8. Where can I learn the terminology?
The catalog glossary on pages 42 to 43 explains terms such as ampacity, main, interrupting capacity, voltage drop, and wire sizing.
Q9. Where should I begin if I am unsure which model fits?
Start with the Design Guide and the catalog Technical Information on pages 38 to 41, then contact Paneltronics with the available space, application, circuit requirements, quantity, and timeline.
How to Configure a Custom Electrical Panel and Request a Quote
Thursday, December 31, 2026
Monday, October 12, 2026
A practical guide to selecting and customizing a Paneltronics AC or DC panel
Thursday, December 31, 2026
Estimated read time: 9 Minutes
Paneltronics offers multiple panel layouts, circuit counts, and metering arrangements. Representative catalog images are shown; available options depend on the model.
Who Should Read This?
This guide is for people specifying, buying, or replacing electrical panels for boats, specialty and emergency vehicles, mobile equipment, and other OEM applications. Whether you need one panel or a production quantity, the process starts with the electrical requirements and the space available for the installation.
What the Panel Configurator Does
The Paneltronics panel configurator enables you to identify the pre-engineered AC or DC panels to configure, capture the electrical specifications, and choose from an assortment of panel options, including meter type, breaker ratings, circuit labels, and more.
Labels are available and can be mailed at a later date if they are not known at the time of quoting or ordering.
Start with the panel selection
Browse the Design Guide or page through the Catalog, located in the bottom right corner of the Paneltronics home page, to become familiar with the panel selection. Panel selections are grouped in Series by the panel width. A pre-engineered panel is an existing Paneltronics model with an established layout and circuit arrangement. You customize that foundation through the options available for the model, rather than beginning with a new panel design.
What this walkthrough covers
For this demonstration we will use a panel from our 3000 Series, our model 3203, a DC 12 position panel with meters and a main breaker. The walkthrough highlights the panel configuration process that applies across all panel Series. The specifications and circuit names will reflect your own equipment.
Breakers and standard function labels are included in the panel cost. Breaker ratings and meter type, where applicable, are needed to process the quote or order.
Prepare your requirements before configuring
Catalog pages 38 to 41 explain the system planning behind panel selection. Gather the following information with the person responsible for your electrical design:
- Available space: panel width, height, depth, cutout, wiring clearance, and access for installation and service.
- Electrical system: AC or DC voltage and the required main and branch breaker ratings. For AC systems, confirm the number of input sources, shore cords, generators, and inverters.
- Circuit schedule: the function and breaker selection for each numbered position, and known labels. Spare positions for future expansion are always recommended.
- Panel features: analog or digital panel meters where available, color, and add-ons such as hinge, frame, enclosure, and door.
- Project details: quantity, application, contact information, requested delivery date, and planned installation date.
What the configurator does and does not do:
- The Paneltronics panel configurator offers dropdown selections for the chosen panel.
- The Paneltronics panel configurator does not perform load calculations or load balancing, size conductors, or confirm the installation design.
- For a marine application, we strongly recommend consulting a certified marine electrician to confirm installation, integration, and compatibility with the new or existing electrical system.
The 3203 example circuit schedule
Our 3203 panel will be configured for a 24VDC application with an 80A main and analog meters. For the branch circuits, positions 1 through 11 have a 5A breaker selected, and position 12 has a 20A breaker. Each circuit has a breaker value and a label in numerical order.
Figure 1. The illustration is for example purposes only. Your panel, breaker, and label selection may differ depending on your specific application.
Step 1 Select an existing panel design
Choose the model that fits your circuit count, electrical arrangement, and available installation space. Model 3203 is a DC circuit breaker panel with 12 branch positions, a main breaker, and meters. Its published dimensions are 13 3/4 inches wide, 7 inches high, and 3 1/2 inches deep.
Figure 2. Model 3203 on the Paneltronics product-search page, with specifications, technical documents, and the CUSTOMIZE button.
Open Tech Info, Wiring, and Cutout Template before selecting CUSTOMIZE. Check the panel dimensions against the available space, and review the connections and service access with your installer. Exterior panel dimensions alone do not establish the cutout or the clearance needed behind the panel.
Consider operation as well as fit
The catalog also calls attention to readable meters, indicator lights, backlit labels, a user-friendly layout, and space for expansion. Construction details such as corrosion-resistant panel material, durable finishes, tinned wiring, and appropriately rated bus bars belong in the selection discussion. Review the specifications for the model and environment you intend to use.
For AC systems, identify every power source and the required source-selection arrangement. The catalog discusses shore power, generators, inverters, leakage protection, reverse polarity, and isolation. Those topics should be resolved with your electrical professional before the panel specification is finalized; selecting a dropdown does not validate the surrounding system.
Step 2 Choose the electrical and physical options
Select CUSTOMIZE to open the Custom Panel page. Work through the options shown for the selected model, using your project requirements as the reference.
Figure 3. The Panel options card before any selections are made.
Our example uses a black panel, lighting, analog meters, 24VDC, and an 80A DC main. AC sources are not applicable. No Hinge, No Frame, and No Enclosure are intentional choices for this demonstration.
Figure 4. The same card with the example selections applied. The product images are generic and may not reflect your panel configuration choices.
Read the selected values rather than relying on the product photograph. Generic artwork may show a standard voltage, meter, or breaker arrangement even when you have requested different options.
Use the catalog order form as a planning checklist
Catalog page 44 brings together model, meter type, color, AC or DC voltage, and main-breaker information. For AC panels, it distinguishes shore, generator, and inverter mains. It also identifies hinge location, frame type, enclosure depth, and protective-door choices. Page 45 records function labels and breaker ratings by position. These are the same kinds of decisions you are organizing online.
The catalog covers options across all panel Series. All options may not be available for every panel. If you need a choice that is not shown, describe it in Special Instructions or contact our sales team so availability and compatibility can be reviewed.
Step 3 Assign breaker ratings and circuit labels
Select the specified breaker rating for each numbered position. To find a label, use as few or as many characters as you like to reveal the label choices from our inventory, then choose the intended entry from the suggestions. Paneltronics offers more than 3,000 function labels for different applications.
Figure 5. The completed example. The green indicators and the Assigned counter confirm each label selection, and position 12 carries the 20A selection.
Follow the numbering through the entire panel. Keep circuit names consistent with drawings, wire identification, and operating documentation.
If the labels are not known at the time of ordering, the interchangeable labels can be mailed at a later date. Tell us that labels are to be sent separately and coordinate the remaining selections with sales. Breaker values and meter type are a must have to process an order or receive a quote.
Step 4 Add the details that need a conversation
Use this section for special instructions regarding drop shipments, custom label requests, or for any additional comment or question that you would want to convey to our team for review.
Figure 6. Special Instructions captures additional requests before PLACE QUOTE opens the next step.
Useful notes include “Do not install labels, send labels separately,” “This panel is close to what I need, but...,” “This is one of four quote requests,” “Can you drop ship this panel?” “Please call to discuss,” or “Are custom labels available?” Include the requested quantity and timing when they affect the project. A note communicates a request; our team will confirm whether it can be accommodated.
Review the configuration before continuing
- Confirm the model, voltage, applicable AC sources, main breaker, meter type, and lighting.
- Check every branch breaker rating and all labels already selected. Identify deferred labels and intentional spare or unused positions.
- Confirm mounting and access requirements, including any hinge, frame, enclosure, or door request.
- Review quantity, requested delivery and installation dates, and special instructions.
The physical dimensions of any Series panel cannot be modified. We are a manufacturing facility, so if you have a project that requires a custom engineering solution with volume, please send an email with drawings, schematics, dimensions, quantities, and project requirements to sales@paneltronics.com or info@paneltronics.com. Reference the online request if you have already submitted one so the supporting information can be associated with it.
Step 5 Submit your request and keep the reference
PLACE QUOTE opens the contact screen. There are three paths, and the difference is what happens to your request after it is sent.
- Continue as Visitor. Enter your name, email, and phone. Your request reaches our team with enough information for us to respond, but it is not attached to a customer account, so you will not have it to refer back to later.
- Login. You already have a Paneltronics account. The request goes in under that account with the rest of your activity.
- Create Account. Submit this request and set up an account at the same time. Future quote requests and orders start faster because your information is already on file.
If you expect to request more than one panel, or you want a record you can return to, the account paths are worth the extra minute.
Figure 7. The contact screen offers visitor, login, and account-creation options, followed by SUBMIT QUOTE.
For the visitor path shown, complete the required first name, last name, email, and phone fields. Middle name and company are optional in this screen. Review the information, then select SUBMIT QUOTE to send the request.
What happens next
You receive a quote or ticket number, and Paneltronics receives a copy to review. Keep that reference for follow-up. You will then be contacted to confirm the price and availability of the panel selected and to address any outstanding questions.
A quote request starts that review; it does not authorize production. Confirm the final configuration, delivery expectations, and applicable order terms before placing the order. Review the catalog terms on page 46 and the terms provided with your quotation, especially before requesting changes to a panel already in production.
When your project needs more than one panel
Paneltronics panels are modular by design. Multiple modular electrical panels can be arranged in a mounting frame, wired together when applicable, when you need more circuits, separate AC and DC power distribution sections, metering, or source-selection functions. Frames, enclosures, and protective doors are additional add-ons to discuss with our team.
Figure 8. Isometric mounting-frame detail showing the relationship between the frame and panel. Catalog page 23.
Figure 9. Standalone electrical enclosures protect the rear of a panel. Confirm the required dimensions and wiring access for your installation. Catalog page 23.
Choose a protective ACRYLIC door
A protective door adds another choice to the mounting arrangement. Paneltronics offers clear or smoked acrylic doors with different opening directions. Discuss the finish, hinge direction, available clearance, and access needs with our team so the door suits the installation.
Figure 10. A multi-panel assembly with its protective door open. Catalog page 23.
Contact us early for custom OEM and volume projects
If you need production quantities, a logo, a different layout, special components, or a complete custom assembly, contact Paneltronics immediately, at the start of the project. An original equipment manufacturer, or OEM, may need a repeatable panel for integration into a product line. Volume requirements are useful to discuss even when a pre-engineered model is the starting point.
Send the intended application, quantities, schedule, drawings or schematics, dimensions, branding requirements, and any environmental or documentation needs to sales@paneltronics.com. Our team can determine whether a configured standard model or a custom design is the appropriate path.
Figure 11. An OEM AC and DC panel and enclosure assembly with hinged sections open to show internal wiring and service access. Catalog page 24.
Select your panel and start the quote
Bring your panel requirements together, select the closest pre-engineered model, and use the configurator to record the details. If your project needs a custom solution or a conversation before you begin, our team can help you decide which path fits.
Request a quote for your next build at paneltronics.com, email sales@paneltronics.com, or call (800) 367-2635. Factory-trained technical support is part of every quote, not an upsell.
About the Author
|
|
Edwin (Ed) Robledo, Paneltronics Senior Technical Marketing. 10+ years of published content creation and technical writing in the electrical and electronics industry, including articles and white papers on circuit, electrical design, and engineering best practices. |
In Collaboration with:
Pedro Pelaez, President of Paneltronics
Mark Gropper, Paneltronics R&D Manager and ABYC Project Technical Committee Member Emeritus
Jose Verdecia, Paneltronics Engineering Manager and ABYC Project Technical Committee Member
Frequently Asked Questions
Q1. What does the Paneltronics panel configurator do?
It gives you a panel template to confirm the panel, the breaker selection, the meter type, and the labels if they are known. It records those selections and sends them to our team as a quote request.
Q2. What information should I have before I start?
The amount of available space, your electrical system requirements, the circuit schedule, the panel features you need, and the timeline to receive and install the panel assembly.
Q3. May I install labels at a later time after install?
Yes. The interchangeable function labels can be selected and mailed separately for later installation. Tell sales what remains undecided and arrange the label selection and shipment.
Q4. Does the configurator size breakers or conductors?
No. Only dropdown selections for the breakers available for each panel are provided. The configurator does not provide a load balance analysis. Have your electrical professional establish the appropriate ratings and system requirements.
Q5. Can several Paneltronics panels be combined in one frame?
Yes. Panels are modular by design and can be arranged in a mounting frame, wired together when applicable. Contact our team so the assembly can be reviewed.
Q6. Does selecting PLACE QUOTE immediately submit the request?
No. PLACE QUOTE opens the contact screen. Enter your information and select SUBMIT QUOTE, and you are done.
Q7. When should I contact Paneltronics about a fully custom OEM panel?
Immediately. Contact us at the start of the project when there is volume, when you need a logo, or when the project requires a custom engineering solution.
Q8. Where can I learn the terminology?
The catalog glossary on pages 42 to 43 explains terms such as ampacity, main, interrupting capacity, voltage drop, and wire sizing.
Q9. Where should I begin if I am unsure which model fits?
Start with the Design Guide and the catalog Technical Information on pages 38 to 41, then contact Paneltronics with the available space, application, circuit requirements, quantity, and timeline.
How to Configure a Custom Electrical Panel and Request a Quote
Thursday, December 31, 2026
Monday, October 12, 2026
A practical guide to selecting and customizing a Paneltronics AC or DC panel
Thursday, December 31, 2026
Estimated read time: 9 Minutes
Paneltronics offers multiple panel layouts, circuit counts, and metering arrangements. Representative catalog images are shown; available options depend on the model.
Who Should Read This?
This guide is for people specifying, buying, or replacing electrical panels for boats, specialty and emergency vehicles, mobile equipment, and other OEM applications. Whether you need one panel or a production quantity, the process starts with the electrical requirements and the space available for the installation.
What the Panel Configurator Does
The Paneltronics panel configurator enables you to identify the pre-engineered AC or DC panels to configure, capture the electrical specifications, and choose from an assortment of panel options, including meter type, breaker ratings, circuit labels, and more.
Labels are available and can be mailed at a later date if they are not known at the time of quoting or ordering.
Start with the panel selection
Browse the Design Guide or page through the Catalog, located in the bottom right corner of the Paneltronics home page, to become familiar with the panel selection. Panel selections are grouped in Series by the panel width. A pre-engineered panel is an existing Paneltronics model with an established layout and circuit arrangement. You customize that foundation through the options available for the model, rather than beginning with a new panel design.
What this walkthrough covers
For this demonstration we will use a panel from our 3000 Series, our model 3203, a DC 12 position panel with meters and a main breaker. The walkthrough highlights the panel configuration process that applies across all panel Series. The specifications and circuit names will reflect your own equipment.
Breakers and standard function labels are included in the panel cost. Breaker ratings and meter type, where applicable, are needed to process the quote or order.
Prepare your requirements before configuring
Catalog pages 38 to 41 explain the system planning behind panel selection. Gather the following information with the person responsible for your electrical design:
- Available space: panel width, height, depth, cutout, wiring clearance, and access for installation and service.
- Electrical system: AC or DC voltage and the required main and branch breaker ratings. For AC systems, confirm the number of input sources, shore cords, generators, and inverters.
- Circuit schedule: the function and breaker selection for each numbered position, and known labels. Spare positions for future expansion are always recommended.
- Panel features: analog or digital panel meters where available, color, and add-ons such as hinge, frame, enclosure, and door.
- Project details: quantity, application, contact information, requested delivery date, and planned installation date.
What the configurator does and does not do:
- The Paneltronics panel configurator offers dropdown selections for the chosen panel.
- The Paneltronics panel configurator does not perform load calculations or load balancing, size conductors, or confirm the installation design.
- For a marine application, we strongly recommend consulting a certified marine electrician to confirm installation, integration, and compatibility with the new or existing electrical system.
The 3203 example circuit schedule
Our 3203 panel will be configured for a 24VDC application with an 80A main and analog meters. For the branch circuits, positions 1 through 11 have a 5A breaker selected, and position 12 has a 20A breaker. Each circuit has a breaker value and a label in numerical order.
Figure 1. The illustration is for example purposes only. Your panel, breaker, and label selection may differ depending on your specific application.
Step 1 Select an existing panel design
Choose the model that fits your circuit count, electrical arrangement, and available installation space. Model 3203 is a DC circuit breaker panel with 12 branch positions, a main breaker, and meters. Its published dimensions are 13 3/4 inches wide, 7 inches high, and 3 1/2 inches deep.
Figure 2. Model 3203 on the Paneltronics product-search page, with specifications, technical documents, and the CUSTOMIZE button.
Open Tech Info, Wiring, and Cutout Template before selecting CUSTOMIZE. Check the panel dimensions against the available space, and review the connections and service access with your installer. Exterior panel dimensions alone do not establish the cutout or the clearance needed behind the panel.
Consider operation as well as fit
The catalog also calls attention to readable meters, indicator lights, backlit labels, a user-friendly layout, and space for expansion. Construction details such as corrosion-resistant panel material, durable finishes, tinned wiring, and appropriately rated bus bars belong in the selection discussion. Review the specifications for the model and environment you intend to use.
For AC systems, identify every power source and the required source-selection arrangement. The catalog discusses shore power, generators, inverters, leakage protection, reverse polarity, and isolation. Those topics should be resolved with your electrical professional before the panel specification is finalized; selecting a dropdown does not validate the surrounding system.
Step 2 Choose the electrical and physical options
Select CUSTOMIZE to open the Custom Panel page. Work through the options shown for the selected model, using your project requirements as the reference.
Figure 3. The Panel options card before any selections are made.
Our example uses a black panel, lighting, analog meters, 24VDC, and an 80A DC main. AC sources are not applicable. No Hinge, No Frame, and No Enclosure are intentional choices for this demonstration.
Figure 4. The same card with the example selections applied. The product images are generic and may not reflect your panel configuration choices.
Read the selected values rather than relying on the product photograph. Generic artwork may show a standard voltage, meter, or breaker arrangement even when you have requested different options.
Use the catalog order form as a planning checklist
Catalog page 44 brings together model, meter type, color, AC or DC voltage, and main-breaker information. For AC panels, it distinguishes shore, generator, and inverter mains. It also identifies hinge location, frame type, enclosure depth, and protective-door choices. Page 45 records function labels and breaker ratings by position. These are the same kinds of decisions you are organizing online.
The catalog covers options across all panel Series. All options may not be available for every panel. If you need a choice that is not shown, describe it in Special Instructions or contact our sales team so availability and compatibility can be reviewed.
Step 3 Assign breaker ratings and circuit labels
Select the specified breaker rating for each numbered position. To find a label, use as few or as many characters as you like to reveal the label choices from our inventory, then choose the intended entry from the suggestions. Paneltronics offers more than 3,000 function labels for different applications.
Figure 5. The completed example. The green indicators and the Assigned counter confirm each label selection, and position 12 carries the 20A selection.
Follow the numbering through the entire panel. Keep circuit names consistent with drawings, wire identification, and operating documentation.
If the labels are not known at the time of ordering, the interchangeable labels can be mailed at a later date. Tell us that labels are to be sent separately and coordinate the remaining selections with sales. Breaker values and meter type are a must have to process an order or receive a quote.
Step 4 Add the details that need a conversation
Use this section for special instructions regarding drop shipments, custom label requests, or for any additional comment or question that you would want to convey to our team for review.
Figure 6. Special Instructions captures additional requests before PLACE QUOTE opens the next step.
Useful notes include “Do not install labels, send labels separately,” “This panel is close to what I need, but...,” “This is one of four quote requests,” “Can you drop ship this panel?” “Please call to discuss,” or “Are custom labels available?” Include the requested quantity and timing when they affect the project. A note communicates a request; our team will confirm whether it can be accommodated.
Review the configuration before continuing
- Confirm the model, voltage, applicable AC sources, main breaker, meter type, and lighting.
- Check every branch breaker rating and all labels already selected. Identify deferred labels and intentional spare or unused positions.
- Confirm mounting and access requirements, including any hinge, frame, enclosure, or door request.
- Review quantity, requested delivery and installation dates, and special instructions.
The physical dimensions of any Series panel cannot be modified. We are a manufacturing facility, so if you have a project that requires a custom engineering solution with volume, please send an email with drawings, schematics, dimensions, quantities, and project requirements to sales@paneltronics.com or info@paneltronics.com. Reference the online request if you have already submitted one so the supporting information can be associated with it.
Step 5 Submit your request and keep the reference
PLACE QUOTE opens the contact screen. There are three paths, and the difference is what happens to your request after it is sent.
- Continue as Visitor. Enter your name, email, and phone. Your request reaches our team with enough information for us to respond, but it is not attached to a customer account, so you will not have it to refer back to later.
- Login. You already have a Paneltronics account. The request goes in under that account with the rest of your activity.
- Create Account. Submit this request and set up an account at the same time. Future quote requests and orders start faster because your information is already on file.
If you expect to request more than one panel, or you want a record you can return to, the account paths are worth the extra minute.
Figure 7. The contact screen offers visitor, login, and account-creation options, followed by SUBMIT QUOTE.
For the visitor path shown, complete the required first name, last name, email, and phone fields. Middle name and company are optional in this screen. Review the information, then select SUBMIT QUOTE to send the request.
What happens next
You receive a quote or ticket number, and Paneltronics receives a copy to review. Keep that reference for follow-up. You will then be contacted to confirm the price and availability of the panel selected and to address any outstanding questions.
A quote request starts that review; it does not authorize production. Confirm the final configuration, delivery expectations, and applicable order terms before placing the order. Review the catalog terms on page 46 and the terms provided with your quotation, especially before requesting changes to a panel already in production.
When your project needs more than one panel
Paneltronics panels are modular by design. Multiple modular electrical panels can be arranged in a mounting frame, wired together when applicable, when you need more circuits, separate AC and DC power distribution sections, metering, or source-selection functions. Frames, enclosures, and protective doors are additional add-ons to discuss with our team.
Figure 8. Isometric mounting-frame detail showing the relationship between the frame and panel. Catalog page 23.
Figure 9. Standalone electrical enclosures protect the rear of a panel. Confirm the required dimensions and wiring access for your installation. Catalog page 23.
Choose a protective ACRYLIC door
A protective door adds another choice to the mounting arrangement. Paneltronics offers clear or smoked acrylic doors with different opening directions. Discuss the finish, hinge direction, available clearance, and access needs with our team so the door suits the installation.
Figure 10. A multi-panel assembly with its protective door open. Catalog page 23.
Contact us early for custom OEM and volume projects
If you need production quantities, a logo, a different layout, special components, or a complete custom assembly, contact Paneltronics immediately, at the start of the project. An original equipment manufacturer, or OEM, may need a repeatable panel for integration into a product line. Volume requirements are useful to discuss even when a pre-engineered model is the starting point.
Send the intended application, quantities, schedule, drawings or schematics, dimensions, branding requirements, and any environmental or documentation needs to sales@paneltronics.com. Our team can determine whether a configured standard model or a custom design is the appropriate path.
Figure 11. An OEM AC and DC panel and enclosure assembly with hinged sections open to show internal wiring and service access. Catalog page 24.
Select your panel and start the quote
Bring your panel requirements together, select the closest pre-engineered model, and use the configurator to record the details. If your project needs a custom solution or a conversation before you begin, our team can help you decide which path fits.
Request a quote for your next build at paneltronics.com, email sales@paneltronics.com, or call (800) 367-2635. Factory-trained technical support is part of every quote, not an upsell.
About the Author
|
|
Edwin (Ed) Robledo, Paneltronics Senior Technical Marketing. 10+ years of published content creation and technical writing in the electrical and electronics industry, including articles and white papers on circuit, electrical design, and engineering best practices. |
In Collaboration with:
Pedro Pelaez, President of Paneltronics
Mark Gropper, Paneltronics R&D Manager and ABYC Project Technical Committee Member Emeritus
Jose Verdecia, Paneltronics Engineering Manager and ABYC Project Technical Committee Member
Frequently Asked Questions
Q1. What does the Paneltronics panel configurator do?
It gives you a panel template to confirm the panel, the breaker selection, the meter type, and the labels if they are known. It records those selections and sends them to our team as a quote request.
Q2. What information should I have before I start?
The amount of available space, your electrical system requirements, the circuit schedule, the panel features you need, and the timeline to receive and install the panel assembly.
Q3. May I install labels at a later time after install?
Yes. The interchangeable function labels can be selected and mailed separately for later installation. Tell sales what remains undecided and arrange the label selection and shipment.
Q4. Does the configurator size breakers or conductors?
No. Only dropdown selections for the breakers available for each panel are provided. The configurator does not provide a load balance analysis. Have your electrical professional establish the appropriate ratings and system requirements.
Q5. Can several Paneltronics panels be combined in one frame?
Yes. Panels are modular by design and can be arranged in a mounting frame, wired together when applicable. Contact our team so the assembly can be reviewed.
Q6. Does selecting PLACE QUOTE immediately submit the request?
No. PLACE QUOTE opens the contact screen. Enter your information and select SUBMIT QUOTE, and you are done.
Q7. When should I contact Paneltronics about a fully custom OEM panel?
Immediately. Contact us at the start of the project when there is volume, when you need a logo, or when the project requires a custom engineering solution.
Q8. Where can I learn the terminology?
The catalog glossary on pages 42 to 43 explains terms such as ampacity, main, interrupting capacity, voltage drop, and wire sizing.
Q9. Where should I begin if I am unsure which model fits?
Start with the Design Guide and the catalog Technical Information on pages 38 to 41, then contact Paneltronics with the available space, application, circuit requirements, quantity, and timeline.